
Studio Set Up – Part 2 discussed adequate light and how to pick a torch. In Part 3 of the Studio Set Up blogs, I assume that your torch is chosen (but maybe not purchased yet) and you’re looking for information about the importance of ventilation. You may also be considering torch and ventilation placement. In this blog post I attempt to clarify some points about set up and answer some big questions about adequate ventilation.

VENTILATION
Overview
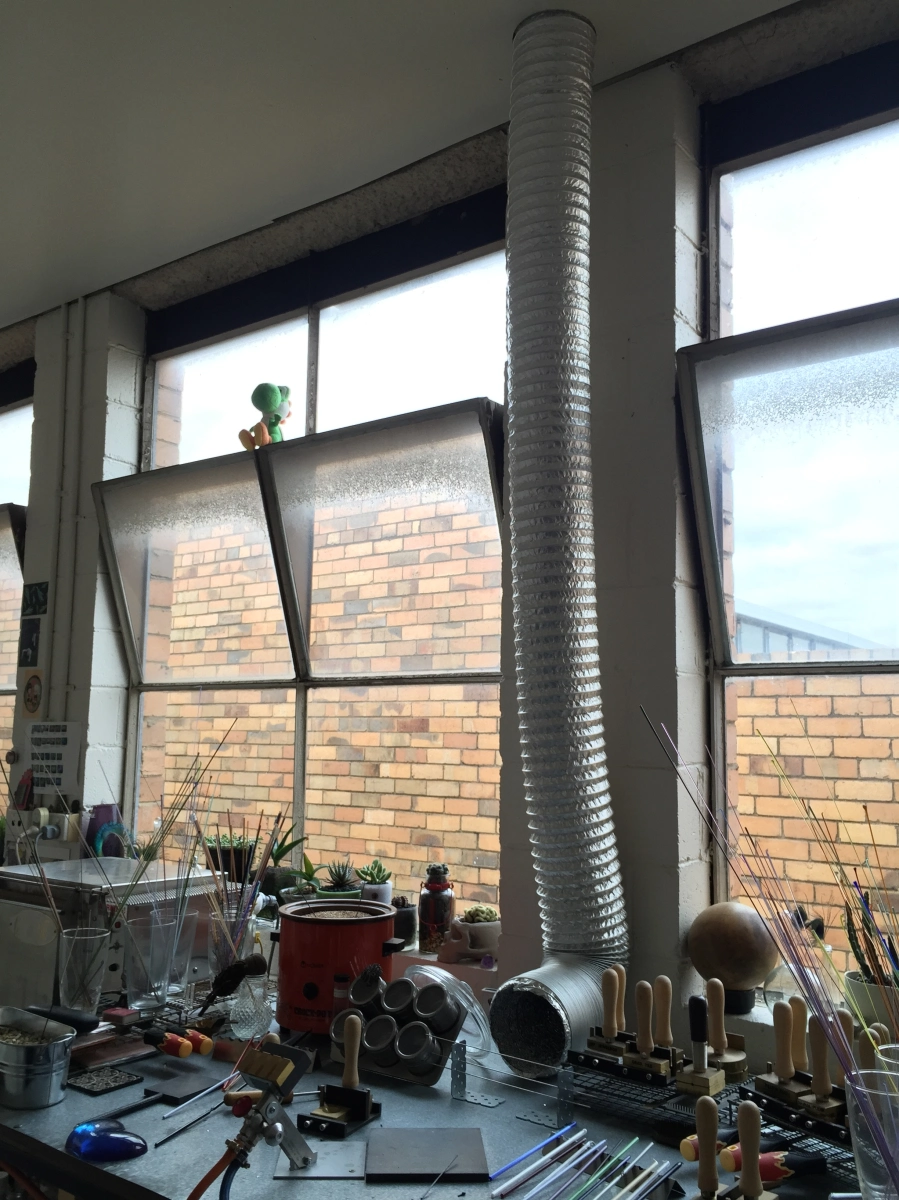
Everyone has an opinion on ventilation because it is very determined by your space and your torch, what works for someone may not work for you. This overview is to help you understand what ventilation is and possible solutions to your inquiries. Lampworking fumes are classed as both “fume” and “dust” as both are released when we melt glass and run our torches. I’m not even going to pretend it’s not expensive to install an extraction unit. If you go this route it will be the priciest thing you purchase. My studio is in rental space and subject to OH&S safety standards, I had a laundry list of precautions to check off before I could even work in there. The most important thing was how to ventilate the space safely and the best method of doing so. Ventilation needs to be in front of your flame preferably, whist you can install it above your flame try not to install it over your head as the fumes will pass by your face on their way up and that is what you’re trying to avoid.
Every country and even different states within a single country have different rules regarding fume and dust extraction. You will need to speak to a qualified and registered electrician who can install extraction units to find out estimated costs in your area. What you want to ask for is an expert who installs small scale fume and dust extraction units to discuss your set up. It’s no point going to a company that only does large scale industrial extraction units for big glass blowing studios. Some countries use the word ventilation and some countries use the word extraction. In Australia ventilation means something different to extraction, extraction is the pricier and proper way of removing surface dust and air impurities. It sucks the fumes and dust out of a very specific space and removes them completely from that space. Extraction units dispel fumes outside after capturing dust particles in filters, their air intake is filtered and also comes from a clean source of air. You can use the yellow pages online or google for companies in your area that will install these units, have them come out and quote you (thankfully that is free) and talk to you about your space (you can learn a lot by talking to different companies about what you need). Ventilation in Australia means a system that can provide an adequate flow of air so that fumes do not build up, it incorporates a low level of extraction. Ventilation units create air flow by sucking up fumes in a general area and relying on mesh screens to catch dust. Air intake is not always filtered or not filtered well and is from within the general vicinity of the unit.
The steps to getting an extraction unit installed
Firstly, a measure of how many cubic squares of air in my studio had to be taken. Then, a record of any draughts, breezes or air exchanges was made to get the standing air purity level (not too pure; it’s an old tyre factory after all, but my studio is surprisingly air tight for such an old building). Then, I had to run the torch and the carbon dioxide levels were tested at different time intervals without an extraction fan or ventilation running. Then, I had to have a swab test for heavy metal residue and have an air purity test after the torch was off to test the fume and dust level.
When all of this was measured the EPA told me how many particles were in the air after a typical lampworking session and what sort of ventilation I would need for the room to be safe. I ended up with a great unit for about $2000.00 AUD all installed, I can’t smell any hint of fumes when I torch. The only downside to this is that it’s so powerful it can suck up silver leaf and enamels, so I need to be careful where I place my graphite pads. Sounds like heavy stuff? Well, yes, you don’t want to mess around with your health.
You’re also probably thinking, oh wow, please tell me there is a cheaper option that isn’t going to clock up big dollar signs? Yes, there is, but it works like this;
If you’re going to be torching for up to 8 hours a day for five days a week, working with silver laden glass or lots of metal inclusions get the super duper deluxe extraction unit installed after having chemical residue testing done. Your lungs will thank you.
If you’re not going to be doing this much torching each day (hell, maybe not even in a week) then there are other options that won’t hurt your pocket (as much) and will save your health. Although the important thing to note with these cheaper units is that they will not suck up those minute heavy metal particles very well, they’re not strong enough. So balance this into your set up equation and wipe down surfaces regularly.
- An open door or window is not adequate ventilation for a lampworker.
- An open door or window with a fan circulating air is not adequate ventilation for a lampworker either.
You are risking your health and others around you if you do not ventilate or extract dust and fumes properly.
So what can I get if I won’t be torching more than a few hours a week?
A good quality ventilation system used in your average commercial kitchen
Yep, that’s right, a canopy extraction unit. This will work well for most small studio set ups and the added bonus is you can get a powerful ventilation unit at scratch and dent sales quite cheaply. Any electrician can install them quickly and with less expense than a serious extraction system (In Australia you must employ the services of a registered electrician).
- Get a commercial canopy hood if you’re going to be using a lot of silver glass (these thingys have multi speed powerful exhaust fans that are made for sucking up lots of fumes and reducing oil particles in the air and they often come with overhead lights).
- Also get this type if you have space in your roof to have the unit as they are very noisy (they sound like 747s taking off)
- Get a canopy or pull/slide out hood if you’re not going to be working much with glass that has a high metal content or not for long periods. They are less powerful than commerical kitchen hoods.
- This type is handy if you don’t have roof cavity space, it can be mounted against a wall with the unit outside, either attached to your wall or on the ground.
Make sure that your regularly wipe surfaces down if you do not have really strong ventilation, one of the things the EPA noted was that the heavy metals adhered to surfaces when I did not have the ventilation running. Along with bead release, enamels and all the other things lampworkers use, getting into the habit of wiping down your studio will keep dust down but will also limit chemical residue build up. If you touch surfaces with heavy residue build up; your skin will absorb the metals. So keep your work station as tidy as you can.
If you do choose to use a kitchen ventilation system you should be cleaning out the screens (you can run most through dishwashers these days) regularly too. Edit 2019, my original extraction unit was calculated on my Minor Burner, when I upgraded to my Mega Minor Burner my extraction unit couldn’t keep up with the additional fumes I was producing from melting glass faster. My solution was to bring back my original electrician who adjusted the settings on the unit (lodged in the roof) to increase the uptake flow. If you upgrade your torch, this may also present as a problem, the quick solution is to open an extra window or door but that might not be possible. If you upgrade your torch, you may need to upgrade your ventilation system at the same time.
Lastly, a word of caution; If you feel light headed, are constantly yawning (this is the first effects of lack of oxygen) and/or when you inhale it feels like a burning or scratchy sensation and/or your chest is suddenly tight. Stop immediately!! Turn off your torch and ventilate the room by opening all doors and windows. Keep your extraction and ventilation running and go outside into fresh air and do not go back and torch. If this is happening to you then you need to get a better extraction unit in and no skimping (and no torching, because you are putting yourself at serious risk).
Zoozii’s used to have a page on their website that discussed how they had their studio tested (in the way that I did). Unfortunately that page is no longer on that website. There is this interesting discussion here about lampworking and pregnancy. What this author writes about is really interesting and an important reality check.
Disclaimer:
My advice is not set in solid gold. It’s only advice, I can’t tell you what you should have or shouldn’t have. I have an extraction unit based on scientific measurements of the pollutants in the atmosphere whilst I melt glass, my health is my number one priority. You should get an extraction unit and not just a kitchen rangehood if you intend to make beads very regularly.
Author’s Note:
I didn’t include details or links in my blog about how to make your own ventilation system. It is cheaper to build your own if you are in the US or Canada, but not here in Australia because a registered electrician has to install the unit. The cheapest option is buying a kitchen canopy hood and having that installed over your workbench. There are instructions around online if you are curious. Also, in some older buildings electrical wiring in Australia is not red, yellow and green, the cable is actually black, red and brown or you may get yellow, brown and red cable. So any instructions I do post may be confusing anyway.

